5 Methods To Cut Bangs At Home Properly
5 Methods To Cut Bangs At Home Properly: Have you ever tried to cut your hair yourself? Well, we can tell that it’s not easy to get a real elaborate cut, but with a little trim or bangs, on the other hand, it seems so tempting to do it! In addition, it saves a trip to the hairdresser, while saving time and money. That said, it can be easy to go wrong and ruin your look if you don’t do it the right way. So here we offer you a little easy guide to cut your curtain bangs yourself like a pro!
The steps to cut your curtain bangs yourself
First, make sure you have good scissors. It cannot be repeated enough: blunt paper scissors are not going to give precise and perfect results, for obvious reasons. Scissors should be sharp and, if possible, designed to cut hair.
This cut should be done on wet hair, but towel-dried. So if you haven’t just washed your hair, you can spray it with water from a spray bottle.
These are The 5 Methods To Cut Bangs At Home Properly
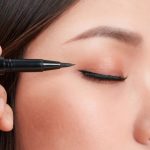
1. Tie up the hair, except the front strands
Notice how the hair has been parted between those tied and those which will constitute the fringe. This is what will make all the difference between a “wow” result and a failed effect. Important: The bang’s hair should be parted first, BEFORE tying up the rest of the hair.
The strands of the front must form a sort of rounded triangle at the top; that is, they should be separated into a point, which falls equally on both sides. In short, the worst thing to do would be to draw a straight line with the comb.
Note: The image does not follow the chronological steps and is similar to the one in step 3. This is intended and is just for visual emphasis on the shape to be observed before parting the hair.
2. Part the hair of the bangs into two equal strands
Some bangs are parted more on one side than the other and the effect is very pretty, but by definition, the curtain bangs are parted in the middle and the two strands are equal. Note also how the locks of the bangs are not very voluminous … You have to try to limit the thickness. Take your time to do step 1 well and make sure you have just enough hair (not too much) in the strands for the bangs; this is the basis!
3. Cross the strands on the front
And making sure they’re perfectly parted in the middle, cross the two strands one on top of the other, applying so that the angles of each are even.
On the video, it looks nice and quick, but in real life (and considering you might not be an expert in the field), it’s better to take your time!
4. Cut the strands of the curtain fringe
The curtain fringe can be shorter or longer; the look is super pretty in both cases! However, be aware that the shorter the fringe, the more maintenance it will require.
In this example, the bangs are quite long; the tips reach the chin. Use the visual example to determine how high the cut should be. Remember that wet hair is longer than when it is dry. Tip: It’s better to make it too long at the start and then edit it than the other way around.
What is especially important to remember is the angle at which the strands are cut. This angle is beveled, which closely follows the curve of the jaw. It is important not to cut at a right angle!
Take your time to cut properly, but with a determined hand. It sounds contradictory, but it is the key to success! You have to have confidence.
5. Dry the hair, one side at a time
First, uncross the strands so that they fall naturally on either side of your face. You can use a blow dryer brush, a round brush, or simply place the hair with your fingers while you dry it, depending on the volume you are looking for.